Sunday, November 25, 2012

Summer Canning Adventures

We tried canning for the first time this summer.  Our first adventure was making salsa.  One beautiful, warm, summer morning (I know these are already getting hard to remember) we went to the local farmer's market and purchased all the veggies we would need for salsa making.  

Green peppers, onion, cilantro, tomatoes, banana peppers, jalapeƱos.


First we had to blanch the tomatoes.  Take the skin off the tomatoes by shortly boiling and then putting it directly into ice cold water.  


Lots and lots of dicing!

We boiled all the chopped ingredients down to the consistency we wanted.  

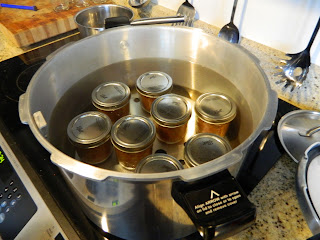
Then into the hot water canning bath they go!


Our finished salsa!  We enjoyed it so much we ended up making another batch just a couple weeks later.  


We also canned peaches.  We purchased these at our local farmer's market as well.  


The peaches also needed to be blanched and cut prior to being canned.  


We have now created quite a stock pile of canned items.  We have canned salsa, peaches, pears, asparagus, carrots, black beans, and green beans.

Tuesday, September 18, 2012

Coasters

Coasters


Making coasters is a simple process but it takes several days.  You will see that I forgot to take a few pictures along the way because some nights I forgot I was going to blog about it!  

Here are most of the materials you will need in order to make your own set of coasters:
Mod podge
Tumbled Marble tiles
Scrapbook paper with patterns of your choosing
Felt pads
Clear coat spray (not shown)
Paint brush
Sandpaper


Trace the shape of the tiles onto the back of the scrapbook paper and cut them out.  


Using the paint brush, paint one coat of Mod Podge onto the back of the tiles.  (I found that the back of the tiles have less flaws and are easier to work with than the front.)  Let the Mod Podge dry for at least an hour and repeat two more times.  You should have a total of three dry layers of Mod Podge before proceeding to the next step.


Paint a layer of Mod Podge onto the side of each scrapbook pattern you want displayed on the final coaster.


After painting each pattern place it face down onto the Mod Podged side of the tile.  Use a credit card to smooth the paper onto the tile.  


Bake/cure all tiles at 170 degrees F for 20 minutes.  Let cool.

Once the tiles have cooled I use sand paper to sand the edges of the scrapbook paper even with the tile so it creates a smooth transition   

Put a little bit of water over the coaster.  
Start rubbing the top layer off of the tile.  
Keep rubbing... 

And rubbing... you might start to loose the feeling in your thumbs.  :)

Once you get down to the design you wanted you can rub as little or as much as you want to give it a worn look.  It is possible to rub so much that you completely rub all design off so be careful.  


Here is were I forgot to take some pictures...
Let the tiles dry overnight.  I spray four layers of the clear coat spray over the tiles.  I usually let it dry at least one hour before applying the next coat.  

Once the clear coats have dried you can add the felt bottoms.  
Your coasters are complete!  


Good luck making your own coasters.  If after reading this you aren't interested in making your own but would like some unique coasters feel free to check out my Etsy website where each set is only $10.
http://www.etsy.com/shop/DowntownLilly
Thanks for reading!


Tuesday, July 31, 2012

Brewing Beer


(Mitch writing)

Most don't know or appreciate the process or the effort that goes into brewing one of the most delicious beverages on Earth.  Over the last few months, I've delved into the craft of home brewing my own beer, and as most who have had the opportunity to sample some know, it's awesome, and I'm hooked.

This is just a brief overview of the brewing process here at our house.  I hope you gain some insight into how it's all done (on a very small scale).


Getting going:

The process begins by mashing malted grains (barley, wheat, etc. that has begun to sprout, creating necessary enzymes that will break down starches into fermentable sugars).   The mashing process consists of holding the grains in water at a specific temperature to allow those enzymes to break down that starch into something I can use.  Here I am stirring up my grains with the strike water for the mash.  I then let the whole pot sit for an hour at those temperatures to let them work.  After the time's up, I can get going brewing!


Once the mash is complete, I pull my mesh bag with the grains out, let the sweet liquid (now called 'wort') drain out, and I can start boiling.


Waiting for the boil to start.  The best part of brew day is enjoying the fruits of your labor, while laboring.


The boil has started!  The boil will last for an hour, during which I will make multiple hop additions to reach the desired bitterness and hop flavor profile for this style.


The hops I am using for this recipe are Simcoe hops.  They tend to lend bright, citrusy flavors and aromas to a beer.


Dumping some of the hops in at a point during the boil.  I think I made four separate additions for this recipe.


After the boil is complete, I need to chill the wort to temperatures the yeast will like as soon as possible.  I take the whole boil kettle inside and set it in a cold water bath in our sink with the water constantly running to cool it all down.  This process usually takes between 30 and 45 minutes, depending on how cold the tap water is.


Once the wort is cool enough, it is time to pitch the yeast ('pitching' simply means to add it to the wort). Here I am rehydrating a dry packet of yeast to prove the yeast's viability.


The chilled wort is dumped into my fermenting bucket.  In order for the yeast to be happiest, the wort needs to be well aerated and full of oxygen.  Some people have high tech oxygen bubbler systems that infuse oxygen directly into the liquid;  I just dump it from a height, making sure I make a lot of bubbles.  It's worked fine so far!


Before I can start any fermentation, I've got to check my gravity to be sure I'm on target.  Gravity readings indicate the density of a liquid.  The amount of dissolved sugar in the wort represents itself as a certain gravity, telling me how much sugar there is available for the yeast to turn into alcohol.  This reading is showing a gravity of 1.053.

I can now pitch my yeast, and let it do its work.  Fermentation can take anywhere from a few days to a couple weeks, depending on the style of beer and the yeast used.  The bucket gets sealed, and airlock is installed to vent the carbon dioxide gas expelled during fermentation, and I get to relax with another beer!


Three batches fermenting in our brewery corner.  Max makes sure everything continues to run smoothly.


Monday, July 16, 2012

Kindergarten Reading Chairs

The back to school creativity has kicked in!  This year Pinterest is making it even worse!  This is one of my newest adventures.  I am VERY proud to say I did this project almost completely on my own!  

The Materials: (getting the materials probably took me the most time of everything!)
Eight crates- which I found 1/2 off at Walmart!  I had trouble finding eight though which meant I had to return to Walmart many times, which I did not enjoy.  
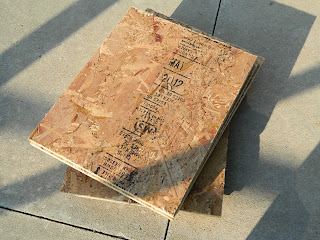
I went to Home Depot and had my new Home Depot friend Tim help cut some plywood for me.  Again, this quickly became a big process for Tim and me.  I ended up spending over an hour and a half with Tim in order to get them all cut out!  It was the first time he had ever cut for anybody!  :)

The Fabric... This was a big decision since my students and I have to look at this everyday.  I ended up driving to three different fabric stores before picking these out.  I hope that the black and white will match my classroom no matter what changes I make.  


The work begins...

Sanding the edges and rounding off the corners.

Cutting the foam.  I guess this is another material I should have put up above as well. (Found it at the fabric store.)  

After cutting the foam I used spray adhesive to stick a small piece of foam to the wood.  

I gave the small piece of foam a day to dry before spraying the larger pieces and attaching them on top of the smaller piece.  This should give lots of cushion for everyone's bottoms! 


I didn't get pictures of us (yes, Mitch had to help me with this) stapling the fabric to the board.  
Here is the finished product!  I am really happy with how they turned out and hopefully my students will enjoy reading on them.  They even have space for storage underneath the lid.